You are here: PS Series Group Administration > Volume Management > Modifying Volume Settings > Moving a Volume Across Pools
By default—or if only one pool exists—a volume will be assigned to the default pool. In multi-member groups, you can separate group space into multiple storage pools and assign members and volumes to the pools. All volume data will be restricted to the members that make up the pool to which the volume is assigned.
As needed, you can move volumes across pools, with no impact on users or applications.
See Storage Pool Management for information about setting up pools.
Notes: Only group administrators can move volumes across pools.
You can move a volume to a different storage pool only if the new pool has free space equal to the size of the volume and any snapshot reserve and local replication reserve for the volume. If the pool does not have enough space, the volume will not move.
While a volume move is in progress, space equal to the volume reserve is allocated in both groups.
If you delete a pool that contains volumes, the volumes will be automatically assigned to the default pool.
If you cancel an in-progress volume move, the volume data will be moved back to the original pool.
To move a volume from one pool to another, click:
Volumes > volume_name > Modify volume settings > General tab
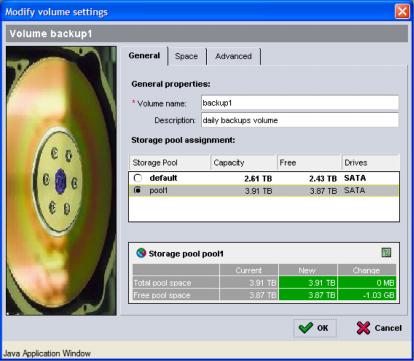
The Modify Volume Settings - General dialog box appears (Figure 19: Modify Volume Settings - General ).
Figure 19: Modify Volume Settings - General
Under Storage pool assignment, select the desired pool for the volume.
The Storage pool space table changes to show the new amounts of free and used space in each pool. If the addition of the volume will exceed the capacity of the pool, the table cell showing free pool space will turn red.
Click OK when you are done.
Note: You can cancel an in-progress volume move operation, if desired, and return volume data to the original storage pool. To cancel a volume move operation, click:
Volumes > volume_name > Cancel volume moving