You are here: PS Series Group Administration > Volume Management > Creating Volumes
When you create a volume, you specify the volume size (reported size that is seen by initiators), snapshot reserve, access control information, and other attributes. An iSCSI target name will be automatically created for the volume.
To create a volume, click:
Volumes > Create volume
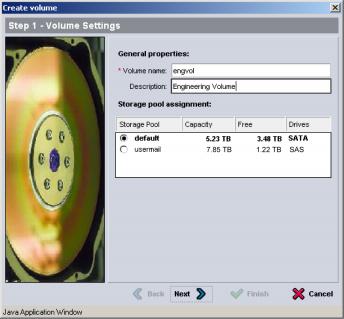
The Create Volume - General Settings dialog box appears (Figure 1: Create Volume - General Settings ).
Figure 1: Create Volume - General Settings
You can specify information in the following fields:
Click Next to display the Create Volume – Space Reserve dialog box (Figure 4: Create Volume - iSCSI Access Policy ).
Figure 2: Create Volume - Space Reserve
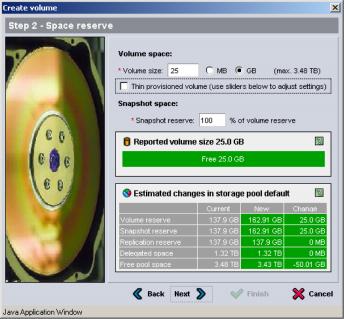
Specify information in the following fields:
Note: For a standard volume (without thin provisioning), the volume reserve (allocated space) is the same as the reported size. For a thin-provisioned volume, the volume reserve will be less than or equal to the reported size.
See Understanding Thin Provisioning for more information.
Figure 3: Volume Create - Space Reserve - Thin-Provisioned Volume
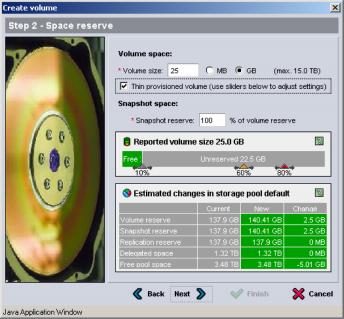
To change the snapshot space recovery policy or warning threshold (the defaults are the group-wide volume settings), you must modify the volume’s snapshot settings after creating the volume, as described in Modifying Snapshot Settings.
The values in the storage pool space tables shown in Figure 2: Create Volume - Space Reserve and Figure 3: Volume Create - Space Reserve - Thin-Provisioned Volume change to show how creating the volume will affect the pool space utilization, as described in Table 1: Storage Pool Space Table Values for Volumes.
|
Space |
Description |
New Value |
|---|---|---|
|
Volume reserve (same as the reported size for volumes without thin provisioning enabled) |
Current amount of pool space allocated to volumes |
New amount of pool space allocated to volumes after creating the new volume |
|
Snapshot reserve |
Current amount of pool space allocated to snapshots of all volumes |
New amount of pool space allocated to all snapshots after adding new volume |
|
Replication reserve |
Current amount of pool space allocated to local replication reserve for all volumes |
New amount of pool space allocated to local replication reserve after adding new volume.
No change for a new volume. |
|
Delegated space |
Pool space delegated to replication partners |
New amount of pool space delegated to replication partners after adding new volume.
No change for a new volume. |
|
Free pool space |
Space in the pool not used or reserved for any purpose |
New amount of free, unused, unreserved pool space after adding new volume |
If creating the volume will exceed the capacity of the pool, the table cell showing free pool space will turn red.
Click Next to display the Create Volume – iSCSI Access Policy dialog box (Figure 4: Create Volume - iSCSI Access Policy ), which enables you to create an access control record for the volume.
Figure 4: Create Volume - iSCSI Access Policy
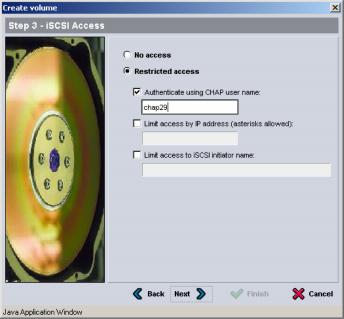
Access control records are used to restrict volume access to hosts that supply a recognized CHAP user name and password (or "secret") or that match an IP address or iSCSI initiator name (or any combination of the three).
To create an access control record that will apply to the volume and its snapshots, in the Create Volume – iSCSI Access Policy dialog box, click Restricted access and one or more of the following:
Note: If using IP addresses or iSCSI initiator names to restrict access, be sure to create an access control record for each IP address or iSCSI initiator name presented by an authorized host.
If you do not want to create an access control record at this time, select No access. No host will be allowed access to the volume until you create a record. You can set up access control records or modify records after creating the volume, as described in Managing Access Controls for Volumes and Snapshots.
After specifying the access information, click Next to display the Create Volume - Summary dialog box (Figure 5: Create Volume - Summary ).
Figure 5: Create Volume - Summary
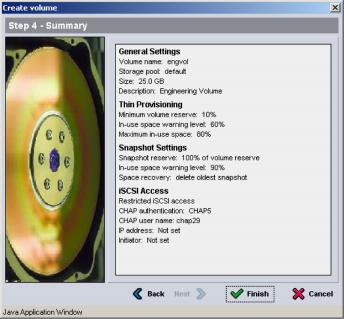
If the configuration is correct, click Finish to create the volume. To make changes, click Back.