Using the Manual Transfer Utility GUI
The Manual Transfer Utility GUI is the recommended method of performing manual transfer replication on a Windows system.
See Installing the Manual Transfer Utility for installation information.
The general steps for using the GUI to perform manual transfer replication are as follows:
- On a system with the Manual Transfer Utility installed and access to the primary group, perform the following steps:
- Log in to the Group Manager GUI on the primary group and configure the volume for replication. Be sure to choose the manual transfer option for the first replication. See Configuring a Volume or Volume Collection for Replication.
- Create a replica, as described in Creating Replicas. This will create a temporary snapshot on the primary group and a replica set and replica placeholder on the secondary group. In addition, action items will appear in the Group Manager GUI’s Outstanding Alarms panel for both groups. The action items remain active until the manual replication is complete and committed on each group.
The temporary snapshot will be automatically deleted after the manual transfer operation completes.
- Start the Manual Transfer Utility GUI and create the transfer files on the system. See Creating Transfer Files Using the GUI.
- Copy the transfer files from the system to external media. For example, if you are using a CD–ROM, use your CD–ROM writer application to copy the files. If you created the transfer files directly on the external media, such as an external hard drive, skip this step.
If you divided the volume data among several transfer files, be sure to copy all the files for the volume onto the external media.
- Transport the media to a system with access to the secondary group.
- On a system with the Manual Transfer Utility installed and access to the secondary group, perform the following steps:
- Make the transfer file data on the external media accessible to the system. For example, insert the CD–ROM or copy the files from tape to a directory.
- Log in to the Group Manager GUI on the secondary group.
- Start the Manual Transfer Utility GUI and load the data from the transfer files into the replica set. Then, confirm when you are done. This will update the replication status on both groups. See Loading Transfer Files Using the GUI.
The following sections describe some of these steps in detail.
Creating Transfer Files Using the GUI
Before you can create transfer files, you must install the Manual Transfer Utility on a system with access to the primary group, as described in Installing the Manual Transfer Utility . In addition, you must create the first replica.
Follow these steps to use the Manual Transfer Utility GUI to create transfer files:
- From the system with the Manual Transfer Utility installed, log in to the Group Manager GUI on the primary group and click:
Volumes > volume_name
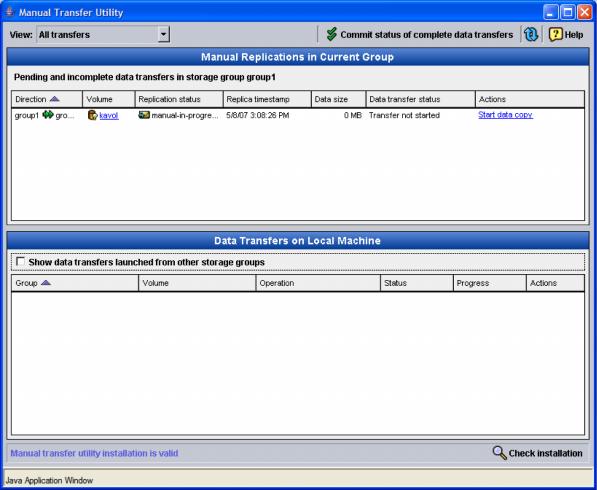
- In the Activities panel, click Perform manual transfer. The Manual Transfer Utility GUI opens (Figure 1: Manual Transfer Utility GUI – Primary Group ).
Figure 1: Manual Transfer Utility GUI – Primary Group
The top panel, entitled Manual Replications in Current Group, shows the manual transfer replication operations for the group to which the system is currently connected, including the direction of data transfer (inbound or outbound), volume name, replication status, replica timestamp, amount of data being transferred, and the status of the data transfer. The Actions column displays a task link.
The bottom panel, entitled Data Transfers on Local Machine, shows the data transfer operations from the system to the current group. If you select Show data transfers launched from other storage groups, data transfer operations from the system to other groups will appear.
- In the Manual Replications in Current Group panel, select the volume for which you want to create transfer files and click the Start data copy link in the Actions column. The Copy Data to Transfer File - Source dialog box appears (Figure 2: Copy Data to Transfer File – Source ).
Figure 2: Copy Data to Transfer File – Source
- By default, Create access policies for local interfaces is selected. Keep this checkbox selected to create temporary access control records that will allow the system’s iSCSI initiator to connect to the temporary snapshot. If the checkbox is not selected, the initiator may not be able to connect to the volume snapshot, and manual transfer replication cannot proceed. The records are deleted automatically when the manual transfer operation is complete.
Click Next. The Copy Data to Transfer File - Destination dialog box appears (Figure 3: Copy Data to Transfer File – Destination ).
Figure 3: Copy Data to Transfer File – Destination
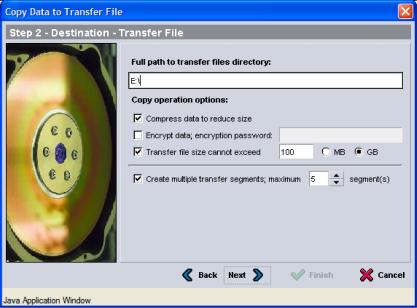
- In the Full path to transfer files directory field, specify either a drive letter (if you are writing the file directly to removable media) or full path where you want the transfer file to be created. (If you have already performed a manual transfer operation, the field will default to the directory used in the last operation.)
The transfer file name is created automatically and uses the following syntax:
primary_name.volume_name.secondary_name.n.eqd
If multiple transfer files are created for the same volume, n indicates the order in which each was created, starting from 0. For a single transfer file, n will be 0.
In addition, select the copy operation options for the data transfer file:
- Compress data to reduce size – This option is selected by default. You can turn off compression if any of the following is true:
- You are writing the transfer file to a medium that has its own compression algorithm (such as a tape)
- Data cannot be compressed (such as video or audio files)
- There is sufficient space for the uncompressed transfer file
- Speed of the copy operation is more important than data compression
- Encrypt data; encryption password – Select this checkbox to apply a password to the transfer file and enter a password in the field. You will need to supply this password when loading the transfer files on the secondary group.
- Transfer file size cannot exceed – Select this checkbox to limit the size of each individual transfer file. Also, select the appropriate unit of measure. Use this option to specify the capacity of the media on which you will be sending the transfer files. By default, the utility limits the transfer file size to 80% of the destination directory or drive capacity.
- Create multiple transfer segments – If you chose to limit the transfer file size (as described above), optionally select this checkbox and enter the number of transfer files you want to create. If you do not know how many files will be needed, specify 100, which is the maximum. The utility will create only as many files as necessary, limited by the maximum size you specified.
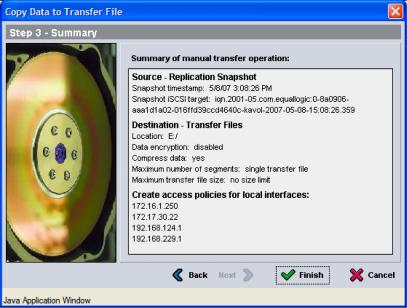
Click Next. The Copy Data to Transfer File – Summary dialog box appears (Figure 4: Copy Data to Transfer File – Summary ).
Figure 4: Copy Data to Transfer File – Summary
- If the information is correct, click Finish to start copying the volume data to the transfer file. To make changes, click Back.
- When the data transfer begins, the Manual Transfer Start confirmation box is displayed (Figure 5: Manual Transfer Start ). Click OK.
Figure 5: Manual Transfer Start

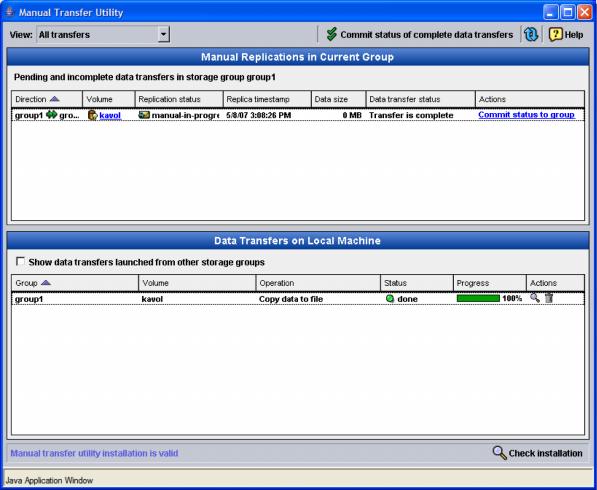
- Check the status of the copy operation in the Manual Transfer Utility GUI window (Figure 6: Manual Transfer Utility GUI – Transfer File Creation Complete ). The Data transfer status column displays one of the following:
- Not started – Transfer has not been started.
- Running – Transfer is in progress. In the bottom panel in the GUI window, the Progress column displays the current percentage of completion.
- Need more files – Additional transfer files need to be created. You must load blank media onto the same drive letter you specified previously (if applicable) and then click Resume (
 ) in the Actions column.
- Interrupted – Manual transfer process was stopped by the user. To continue creating transfer files, click Resume (). Note that if you stop and resume the process of copying data to the transfer files, the utility will create the next file in the sequence. The utility cannot resume copying data into an existing transfer file.
- Transfer is complete – All necessary transfer files have been created for the volume.
- Error – An error occurred.
Figure 6: Manual Transfer Utility GUI – Transfer File Creation Complete shows the Manual Transfer Utility GUI window after all the transfer files have been created.
Figure 6: Manual Transfer Utility GUI – Transfer File Creation Complete
- Optionally, when all the transfer files have been created, you can clear the action item in the Group Manager GUI by clicking Commit status to group.
The action item on the secondary group remains active until you have finished loading the transfer files into the replica set and committed that operation.
- Exit the Manual Transfer Utility GUI.
The next step is to copy the files to external media and then transport the media to the system with access to the secondary group. You might need to use a separate application (such as a CD–ROM writer application) to copy the files to external media.
You can then load the transfer files into the replica set on the secondary group, as described in Loading Transfer Files Using the GUI.
Loading Transfer Files Using the GUI
To complete the process of manual transfer replication, use the Manual Transfer Utility GUI to load the data from the transfer files into the replica set on the secondary group and then confirm that the process is complete.
Before you can load data, you must install the Manual Transfer Utility on a system with access to the secondary group, as described in Installing the Manual Transfer Utility . In addition, make the transfer files on the external media accessible to the system. For example, insert the CD–ROM or copy the files from tape to a directory.
Follow these steps to load data into a replica set:
- From the system with the Manual Transfer Utility installed, log into the Group Manager GUI on the secondary group and select the replica set by clicking:
Replication Partners > partner_name > Inbound tab > replica_set
The replica set is identified by the volume name.
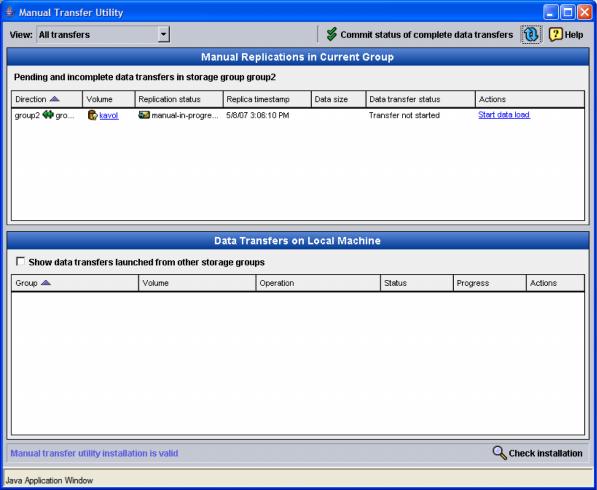
- In the Activities panel, click Perform manual transfer. The Manual Transfer Utility GUI opens (Figure 7: Manual Transfer Utility GUI – Secondary Group ).
The top panel, entitled Manual Replications in Current Group, shows the manual transfer replication operations for the group to which the system is currently connected, including the direction of data transfer, volume name, replication status, replica timestamp, amount of data being transferred, and the status of the data transfer. The Actions column displays a task link. The Data size column does not apply to the load operation and does not represent the size of the transfer file (or files).
The bottom panel, entitled Data Transfers on Local Machine, shows the data transfer operations from the system to the current group. If you select Show data transfers launched from other storage groups, data transfer operations from the system to other groups will appear.
Figure 7: Manual Transfer Utility GUI – Secondary Group
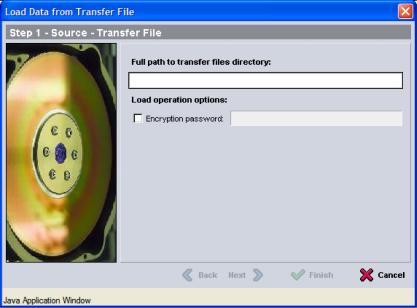
- In the top panel, select the volume and click Start data load. The Load Data from Transfer File - Source dialog box appears (Figure 8: Load Data from Transfer File - Source ).
Figure 8: Load Data from Transfer File - Source
- Enter the path to the transfer file. For mounted removable media (for example, a CD-ROM), specify the drive letter.
If the data transfer file was encrypted, select Encryption password and enter the correct password.
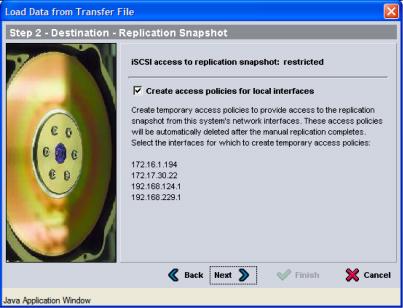
Click Next. The Load Data from Transfer File - Destination dialog box appears (Figure 9: Load Data from Transfer File – Destination).
Figure 9: Load Data from Transfer File – Destination
- By default, the checkbox next to Create access policies for local interfaces is selected. Keep this checkbox selected to create temporary access control records that will allow the system’s iSCSI initiator to connect to the replica set. If the checkbox is not selected, the initiator may not be able to connect to the replica set, and manual replication cannot proceed. The records are deleted automatically when the manual transfer operation is complete.
Click Next. The Load Data from Transfer File - Summary dialog box appears (Figure 10: Load Data from Transfer File – Summary ).
Figure 10: Load Data from Transfer File – Summary
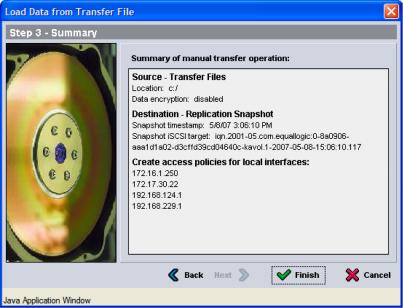
- If the information is correct, click Finish to start the data load operation. To make changes, click Back.
- When the data load operation begins, the Manual Transfer Start confirmation box is displayed (Figure 5: Manual Transfer Start ). Click OK.
- Check the status of the data load in the lower panel of the Manual Transfer Utility GUI window (Figure 7: Manual Transfer Utility GUI – Secondary Group ).
If all the transfer files are available to the system, they are all loaded automatically.
If there are more files to load, More files needed will appear in the Data transfer status column. Make them available to the system and then click the Resume icon () in the Actions column.
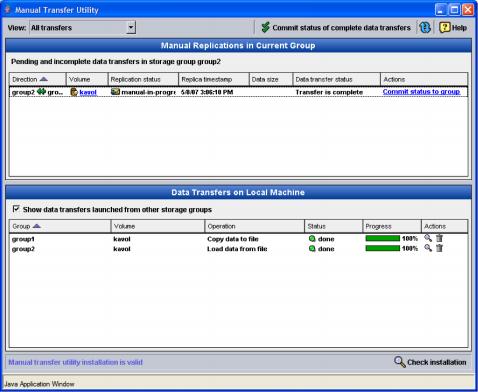
- When the Manual Transfer Utility GUI shows the load operation status done, click Commit status to group in the top panel.
Figure 11: Manual Transfer Utility GUI – Load Complete shows a completed manual transfer that is ready to be committed. The bottom panel displays the history of this transfer operation, including the copy step (on the primary group) and the load step (on the secondary group).
Figure 11: Manual Transfer Utility GUI – Load Complete
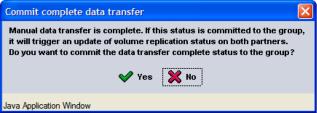
- In the Commit Complete Data Transfer confirmation box (Figure 12: Commit Complete Data Transfer ), click Yes to confirm that all the data transfer files for the volume have been loaded into the replica set on the secondary group.
This sends a confirmation message to the primary group, and clears the manual transfer replication action item for this operation in the Outstanding Alarms panel on both groups. In addition, the operation is cleared from the top panel of the Manual Transfer Utility GUI window.
Figure 12: Commit Complete Data Transfer
Managing Completed Operations Using the GUI
You can check the status of a manual transfer operation from a system with the Manual Transfer Utility installed and access to the group. You can also commit data transfers or clear a completed data transfer from the Manual Transfer Utility GUI.
Log into the Group Manager GUI, expand the Tools panel, and start the Manual Transfer Utility GUI. The bottom panel of the Manual Transfer Utility GUI (Figure 11: Manual Transfer Utility GUI – Load Complete ) shows the history of manual transfer operations performed on the system connected to the group.
To confirm that a data transfer is complete, click Commit status of complete data transfers at the top of the window.
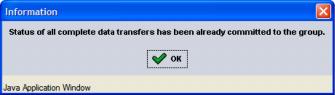
If there are no uncommitted transfers, the Data Transfers Already Committed confirmation box appears (Figure 13: Data Transfers Already Committed ). Click OK.
Figure 13: Data Transfers Already Committed
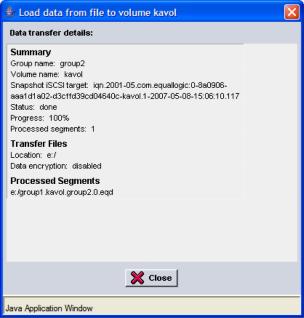
To see the details for a specific manual transfer operation, select the operation in the bottom panel and click the Show details icon ( ) in the Actions column. The Data transfer details window appears (Figure 14: Data Transfer Details for a Volume ).
Figure 14: Data Transfer Details for a Volume
To clear a completed data transfer from the Manual Transfer Utility GUI and, optionally, delete the transfer files associated with the operation, select the operation in the bottom panel and click the Delete transfer task icon ( ) in the Actions column.
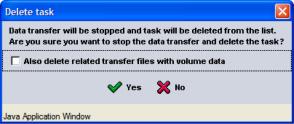
The Delete Task confirmation box appears (Figure 15: Delete Task ).
Figure 15: Delete Task
To delete the transfer files, select Also delete related transfer files with volume data.
Then, click Yes. The operation will disappear from the lower panel.